So you've left my warnings unheeded? Very well, let's get to it then. To follow along, you'll probably want to look at the components list from the rules PDF. There's actually 2 versions of the rules there: the authentic version and the "Oh God, my eyes! Make it stop!" version. So let's talk about the board first. The first step is going to Michaels and getting three 1/2"-thick foam boards. I don't remember the exact dimensions, but they were something around 30" x 15". Two of these boards served as two halves of the base of the board, and the third I cut up to form the mountain in the middle. Basically you want to cut the base and the mountain up so that it accommodates the following array of hexes, which each measure 2 3/4" inches side-to-side:  For the mountain, basically each increase in elevation (the numbers are the elevation and the base is at zero) is going to be an extra layer of 1/2" foam, so that the summit of the mountain of the mountain is 3" off the table. You can use thicker foam or multiple layers for each elevation change if you want the mountain to be taller. Next you'll want to decorate your board with hex tiles. You can look at the above image for a reference on what colors go where, but, honestly, as long as there's an even distribution of yellow, blue, red and green tiles thrown in (along with some doom points), you should be fine. The trick for authenticity is to cut out the colored hexes from construction paper, and then print off octagons of slightly different color with the land labels and tape those on top of the construction paper hexes. Here's a PDF for the octagons. A point of order here: I looked everywhere I could for the font they used for all the text. It's not exact, but Devinne Swash is pretty darn close.
  Now that the board is squared away, let's talk about the cones. Obviously in the video they used foam cones from Michaels, as well, which is fine except they are expensive, and you'll need 32 of them. So unless you want to drop $150, I'd highly recommend investing in construction paper instead. You can even use the same kind you were using to make the hexes. And the bonus here is that they're already colored so you don't even have to spray-paint them. Just take a 12" x 17 3/4" sheet (also available at Michaels) and cut from the center of a short side to an opposite corner. Now roll up the paper so the short side becomes a point and the opposite side becomes the base, then put a single piece of tape on the top right corner - which is now somewhere in the middle of your contraption - to keep it from unraveling. You'll need to cut some excess off the base so that the cone stands up straight, but that's pretty much it!
 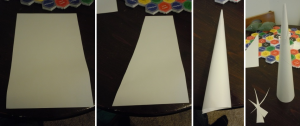 Now just do that ~30 more times for all the cones, using one of those sheets cut in half for the smaller subcones. You'll need a total of 8 cones and 8 subcones in each of the 4 colors, as well as a white cone and a black cone for the central cone of decision. An added bonus for using construction paper is that they're hollow and are much easier to store away. Next we're gonna need a lot of other little bits. You can cannibalize your other games for some of the other bits like wood, stone and iron resources and the irrigation/famine tokens (thanks Agricola!). Also hopefully you've got some minis laying around to use for the 8 avatars. I used my minis from Mage Knight, plus some others from my D&D box. It helps if they somewhat vaguely match the player colors (red, blue, yellow, green, black, white, grey and purple)
 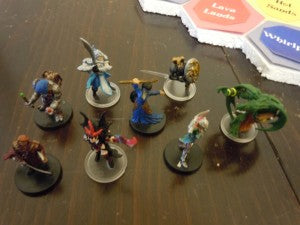 The real problem is that you need 7 other different bits in each of those colors to represent the buildings and troops of each player. I couldn't think of a good cost-effective solution for this, so I went to Print and Play Productions and was able to find all the bits I needed. It ended up being, like, $80 or something, which was sad. Except the troops. For the troops I used this fine little product, which I had laying around from other projects. You'll also need 12 each of 6-sided, 8-sided and 4-sided dice. And the 8-sided and 4-sided needed to be altered so that they display a color on whatever side or corner is rolled. For the d8s, you want an even distribution of yellow, blue, red and green on each one, and for the d4s you want every combination of two of those four colors, where one color is on three corners, and the second color is on one corner. I did this by applying blank labels to the sides, cut to size, and then drew on the labels with colored pencil (markers might be better, though).
  And now all that's left is the cards. There are a lot of cards, but you can find a print-and-play PDF here. It alternates front and back sides of cards, so you'll want to print double-sided. You'll notice that the cards look rather mundane, and I'm sorry for that. The cards in my game had a bunch of cool art instead of monochromatic boxes, but it was stuff I lifted off of deviantART and I don't feel comfortable distributing that around without the artists' consent. Oh! And I almost forgot! You also need representations of the 4 gods. I left this until the last minute for my game and had to get creative during a late-night trip to Target. The rules say you'll need a dragon:
  But I think you should also have on hand a kraken:
  a minotaur:
  and a lava worm:
 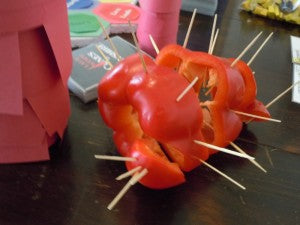 I ended up eating the lava worm with hummus and black bean dip after our first session,
  so we had to make another one when we finished the game 2 weeks later. He didn't last very long, either.
 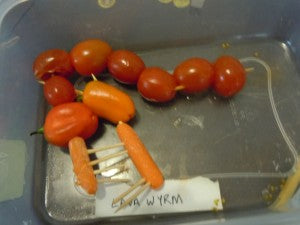 And that's it! If there's something else you need help with or are confused about, please let me know in the comments. Also I'd love to see pictures of your own Cones of Dunshire creations!
 For the mountain, basically each increase in elevation (the numbers are the elevation and the base is at zero) is going to be an extra layer of 1/2" foam, so that the summit of the mountain of the mountain is 3" off the table. You can use thicker foam or multiple layers for each elevation change if you want the mountain to be taller. Next you'll want to decorate your board with hex tiles. You can look at the above image for a reference on what colors go where, but, honestly, as long as there's an even distribution of yellow, blue, red and green tiles thrown in (along with some doom points), you should be fine. The trick for authenticity is to cut out the colored hexes from construction paper, and then print off octagons of slightly different color with the land labels and tape those on top of the construction paper hexes. Here's a PDF for the octagons. A point of order here: I looked everywhere I could for the font they used for all the text. It's not exact, but Devinne Swash is pretty darn close.
  Now that the board is squared away, let's talk about the cones. Obviously in the video they used foam cones from Michaels, as well, which is fine except they are expensive, and you'll need 32 of them. So unless you want to drop $150, I'd highly recommend investing in construction paper instead. You can even use the same kind you were using to make the hexes. And the bonus here is that they're already colored so you don't even have to spray-paint them. Just take a 12" x 17 3/4" sheet (also available at Michaels) and cut from the center of a short side to an opposite corner. Now roll up the paper so the short side becomes a point and the opposite side becomes the base, then put a single piece of tape on the top right corner - which is now somewhere in the middle of your contraption - to keep it from unraveling. You'll need to cut some excess off the base so that the cone stands up straight, but that's pretty much it!
  Now just do that ~30 more times for all the cones, using one of those sheets cut in half for the smaller subcones. You'll need a total of 8 cones and 8 subcones in each of the 4 colors, as well as a white cone and a black cone for the central cone of decision. An added bonus for using construction paper is that they're hollow and are much easier to store away. Next we're gonna need a lot of other little bits. You can cannibalize your other games for some of the other bits like wood, stone and iron resources and the irrigation/famine tokens (thanks Agricola!). Also hopefully you've got some minis laying around to use for the 8 avatars. I used my minis from Mage Knight, plus some others from my D&D box. It helps if they somewhat vaguely match the player colors (red, blue, yellow, green, black, white, grey and purple)
  And now all that's left is the cards. There are a lot of cards, but you can find a print-and-play PDF here. It alternates front and back sides of cards, so you'll want to print double-sided. You'll notice that the cards look rather mundane, and I'm sorry for that. The cards in my game had a bunch of cool art instead of monochromatic boxes, but it was stuff I lifted off of deviantART and I don't feel comfortable distributing that around without the artists' consent. Oh! And I almost forgot! You also need representations of the 4 gods. I left this until the last minute for my game and had to get creative during a late-night trip to Target. The rules say you'll need a dragon:
  But I think you should also have on hand a kraken:
  a minotaur:
  and a lava worm:
  I ended up eating the lava worm with hummus and black bean dip after our first session,
  so we had to make another one when we finished the game 2 weeks later. He didn't last very long, either.
  And that's it! If there's something else you need help with or are confused about, please let me know in the comments. Also I'd love to see pictures of your own Cones of Dunshire creations!
Leave a comment
This site is protected by hCaptcha and the hCaptcha Privacy Policy and Terms of Service apply.